Pterodactyl
Join me as we walk through setting up Pterodactyl, a game server hosting platform!
In my group of friends I am usually the one that hosts the server when we play a multiplayer game together. This has gone back for years, since the Minecraft days in 2012, all the way to our Factorio and other servers today. I recently came across a tool called Pterodactyl, which creates a UI for friends and others to login, spin up and maintain game servers, without having to touch the back-end at all. I thought this would be a great way to let my friends provision servers without me having to do it for them, or do other administrative tasks (usually a server restart) on their own.
This guide will be heavily based on the Panel Documentation and Wings Documentation.
Another note for my setup, is that I will be running panel behind a reverse proxy, in my case Nginx Proxy Manager.
Even if I'm the only one who ever uses it, or it never gets used at all, I think it will be a fun project regardless, so let's get started!
Panel
Panel is the Web UI that users will interact with to setup game servers. We will set this up first, and then install Wings later.
Prerequisites
Operating System
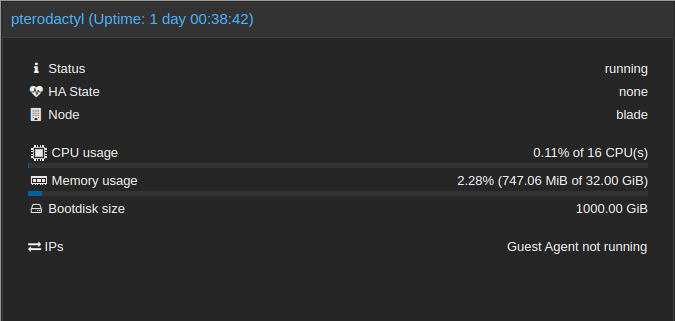
The documentation lists a few options for OS's you can use to run Pterodactyl, I am a fan of Debian and Ubuntu, and will be using Ubuntu Server 22.04 VM hosted on one of my Proxmox nodes. I've already done the VM creation, OS install, and setup my SSH keys, but I'll give a quick overview of what I'm using for this VM:
- 16 CPU's (4 Socket x 4 Core)
- 32GB RAM
- 1TB Storage
- Ubuntu Server 22.04
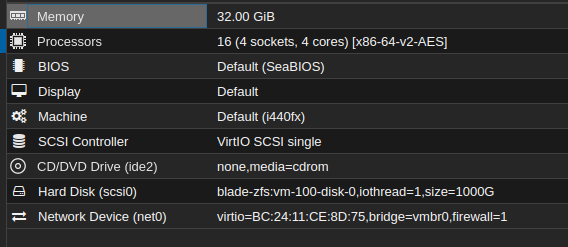
Pterodactyl can be installed on a bare-metal server, or a VM depending on your use case. I happen to have a server with lots of juice, so I chose to virtualize on that server, but as long as you are running Ubuntu or Debian, this guide should apply to you.
Software Dependencies
These are again from the Pterodactyl Documentation.
- PHP
8.0or8.1(recommended) with the following extensions:cli,openssl,gd,mysql,PDO,mbstring,tokenizer,bcmath,xmlordom,curl,zip, andfpmif you are planning to use NGINX. - MySQL
5.7.22and higher (MySQL8recommended) or MariaDB10.2and higher. - Redis (
redis-server) - A webserver (Apache, NGINX, Caddy, etc.). I will be using NGINX for this guide.
curltarunzipgitcomposer(v2)
These can be installed one at a time, or in bulk using something like below:
(make sure to run as root)
# Add "add-apt-repository" command
apt -y install software-properties-common curl apt-transport-https ca-certificates gnupg debian-keyring debian-archive-keyring

# Add additional repositories for PHP, Redis, and MariaDB
LC_ALL=C.UTF-8 add-apt-repository -y ppa:ondrej/php

# Add Redis official APT repository
curl -fsSL https://packages.redis.io/gpg | sudo gpg --dearmor -o /usr/share/keyrings/redis-archive-keyring.gpg
echo "deb [signed-by=/usr/share/keyrings/redis-archive-keyring.gpg] https://packages.redis.io/deb $(lsb_release -cs) main" | sudo tee /etc/apt/sources.list.d/redis.list

# Update repositories list
apt update

# Install Dependencies
apt -y install php8.1 php8.1-{common,cli,gd,mysql,mbstring,bcmath,xml,fpm,curl,zip} mariadb-server nginx tar unzip git redis-server
bash
Composer
Composer is a dependency manager for PHP, which Pterodactyl uses to operate to web UI panel. You can install it using the following command:
curl -sS https://getcomposer.org/installer | sudo php -- --install-dir=/usr/local/bin --filename=composerbash
File Setup
We will want to make a folder where we can install and setup Pterodactyl's web UI, called Panel. First we'll want to make a directory under /var/www/ to hold all our files, and if necessary make our service user the owner.
In my case, I have a user called ptero that I am making the service user, but you can use whichever user, or leave it as root (though I highly recommend making a separate service user).
mkdir -p /var/www/pterodactyl
chown ptero:ptero /var/www/pterodactyl/
cd /var/www/pterodactyl
bash
Now that we are in the new directory, let's download the files we need from the Pterodactyl Panel official GitHub and unzip the files:
curl -Lo panel.tar.gz https://github.com/pterodactyl/panel/releases/latest/download/panel.tar.gz
tar -xzvf panel.tar.gz
chmod -R 755 storage/* bootstrap/cache/
bash
Installation and Config
Now that we have all the prerequisites installed, and a folder with our Panel setup, now we need to install and configure some of the core components for Pterodactyl to work properly.
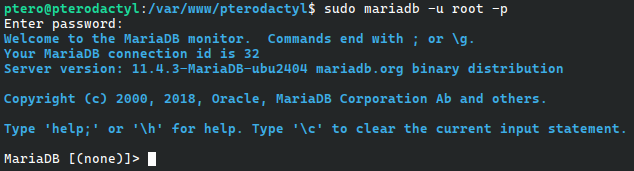
Database Creation
With mariadb installed as our database, we now need to create a SQL user with security. Enter mariadb's SQL CLI using the following command:
(leave password empty, just press enter)
sudo mariadb -u root -pbash
You should now see a MariaDB CLI
You can now enter this SQL to create a new user with permissions. Make sure to replace 'yourPassword' with an actual password, but keep the single quotes (') around the password itself.
# Remember to change 'yourPassword' below to be a unique password
CREATE USER 'pterodactyl'@'127.0.0.1' IDENTIFIED BY 'yourPassword';
CREATE DATABASE panel;
GRANT ALL PRIVILEGES ON panel.* TO 'pterodactyl'@'127.0.0.1' WITH GRANT OPTION;
exit
SQL
Copy over the default environment settings.
cp /var/www/pterodactyl/.env.example /var/www/pterodactyl/.envbash
Now use compose to install core dependencies.
(ideally you would not run this next command as root)
composer install --no-dev --optimize-autoloaderbash
Now we'll use a PHP package to create a new encryption key.
ONLY DO THIS FOR FIRST TIME SETUP! IF YOU HAVE ANYTHING SETUP IN PTERODACTYL, IT WILL MAKE YOUR DATA UNREADABLE!
# Only run the command below if you are installing this Panel for
# the first time and do not have any Pterodactyl Panel data in the database.

php artisan key:generate --force
bash
Take note of the APP_KEY value and store it somewhere safe. This is the encryption key for all your data in Pterodactyl, and is necessary for decryption. Without it, all data will be unreadable. Store it somewhere off-server, like a password manager
cat /var/www/pterodactyl/.env | grep "APP_KEY"bash
Environment Setup
Run this following command to setup your environment
php artisan p:environment:setupbash
This will ask for information like an email address, a URL, timezone, drivers, etc.
I used the following settings:
Author email: example@n8pete.com
Application URL: example.n8pete.com
Timezone: America/Chicago
Cache Driver: redis
Session Driver: redis
Queue Driver: redis
UI based settings editor?: yes
Anonymous telemetry data?: yes
Redis host: 127.0.0.1 (default)
Redis password: _blank_ (default)
Redits port: 6379 (default)
Now configure the database credentials:
php artisan p:environment:databasebash
I used the following settings:
(All settings are default except password. To use default, just leave the response blank and press enter)
Database host: 127.0.0.1 (default)
Database port: 3306 (default)
Dasebase name: panel (default)
Database username: pterodactyl (default)
Database password: (PASSWORD SET EARLIER)
These setup scripts will place the values into the .env file, which contains sensitive information like passwords and encryption keys. TREAT THIS FILE SAFELY!
Database Setup
This command will now setup Pterodactyl using the database you created earlier, and the environment settings we just setup. It may take awhile to run, DO NOT exit the process until it is complete!
php artisan migrate --seed --forcebash
First User Setup
Now we will setup our first user, which we will make an admin user. According to Pterodactyl's documentation, the password has the following requirements: 8 characters, mixed case, at least one number.
php artisan p:user:makeAdministrator user?: yes
Email address: example@example.com (anonymized)
Username: n8pete (use your own)
First Name: Nathan (use your own)
Last Name: Server (I didn't see a need to use a real last name)
Password: (create own password)Webserver Permissions
To give the NGINX service the permissions it needs to the folder, we will now set that user to own the folder:
chown -R www-data:www-data /var/www/pterodactyl/*bash
Queue Listeners
Pterodactyl uses queues to handle actions such as sending emails, cleanup, and other scheduled tasks. We will need to setup a queue worker to take care of these tasks.
Crontab
First, we want to create a cronjob that will run every minute to process our Pterodactyl tasks. Run sudo crontab -e to open the crontab, and then paste the following line at the bottom:
(if it says crontab command is not found, you can install cron by running sudo apt install cron)
* * * * * php /var/www/pterodactyl/artisan schedule:run >> /dev/null 2>&1cron entry
Create Queue Worker
Now let's create a systemd worker to keep the process going in the background.
Create a file called pteroq.service in /etc/systemd/system with the following contents:
(Since we configured our environment to use redis, we will keep the line After=redis-server.service)
# Pterodactyl Queue Worker File
# ----------------------------------

[Unit]
Description=Pterodactyl Queue Worker
After=redis-server.service
# If you are NOT using redis for anything, make sure to remove the line above

[Service]
# On some systems the user and group might be different.
# Some systems use `apache` or `nginx` as the user and group.
User=www-data
Group=www-data
Restart=always
ExecStart=/usr/bin/php /var/www/pterodactyl/artisan queue:work --queue=high,standard,low --sleep=3 --tries=3
StartLimitInterval=180
StartLimitBurst=30
RestartSec=5s

[Install]
WantedBy=multi-user.target
systemd
Now we will enable the redis server service
sudo systemctl enable --now redis-serverbash
And then the pterodactyl service
sudo systemctl enable --now pteroq.servicebash
Now our databases and the Pterodactyl service are running! Next we need to configure the webserver.
Webserver Configuration
For our webserver, we will be using NGINX. Since I am running this behind a reverse Proxy, I only need to use a self-signed certificate on the back-end NGINX instance to facilitate communication between it and the Proxy Manager. The Proxy Manager will handle TLS certificates for the public web.
First, let's generate the self-signed certificate for the NGINX instance. This will create a new folder called certs in our pterodactyl folder, and then generate the self-signed certificate there.
It will ask some questions, your answers are not super important, but you should still answer them fairly reasonably so you can identify the certs later if needed. The cert that is generated will last for 10 years.
mkdir /var/www/pterodactyl/certs
cd /var/www/pterodactyl/certs

openssl req -sha256 -addext "subjectAltName = DNS:pterodactyl.local" -newkey rsa:4096 -nodes -keyout privkeyselfsigned.pem -x509 -days 3650 -out fullchainselfsigned.pem
bash
Now we will want to remove the default configuration
rm /etc/nginx/sites-enabled/defaultbash
Now we want to make a new config file at the location /etc/nginx/sites-available/pterodactyl.conf. Use the following config, but replace <domain> with either the domain name (server.website.com) if you are routing directly to this server, or the IP address if you are only using Pterodactyl internally, or using a reverse proxy.
server_tokens off;

server {
    listen 80;
    server_name <domain>;
    return 301 https://$server_name$request_uri;
}

server {
    listen 443 ssl http2;
    server_name <domain>;

    root /var/www/pterodactyl/public;
    index index.php;

    access_log /var/log/nginx/pterodactyl.app-access.log;
    error_log  /var/log/nginx/pterodactyl.app-error.log error;

    # allow larger file uploads and longer script runtimes
    client_max_body_size 100m;
    client_body_timeout 120s;

    sendfile off;

    # SSL Configuration - Replace the example <domain> with your domain
    ssl_certificate /var/www/pterodactyl/certs/fullchainselfsigned.pem;
    ssl_certificate_key /var/www/pterodactyl/certs/privkeyselfsigned.pem;
    ssl_session_cache shared:SSL:10m;
    ssl_protocols TLSv1.2 TLSv1.3;
    ssl_ciphers "ECDHE-ECDSA-AES128-GCM-SHA256:ECDHE-RSA-AES128-GCM-SHA256:ECDHE-ECDSA-AES256-GCM-SHA384:ECDHE-RSA-AES256-GCM-SHA384:ECDHE-ECDSA-CHACHA20-POLY1305:ECDHE-RSA-CHACHA20-POLY1305:DHE-RSA-AES128-GCM-SHA256:DHE-RSA-AES256-GCM-SHA384";
    ssl_prefer_server_ciphers on;

    # See https://hstspreload.org/ before uncommenting the line below.
    # add_header Strict-Transport-Security "max-age=15768000; preload;";
    add_header X-Content-Type-Options nosniff;
    add_header X-XSS-Protection "1; mode=block";
    add_header X-Robots-Tag none;
    add_header Content-Security-Policy "frame-ancestors 'self'";
    add_header X-Frame-Options DENY;
    add_header Referrer-Policy same-origin;

    location / {
        try_files $uri $uri/ /index.php?$query_string;
    }

    location ~ \.php$ {
        fastcgi_split_path_info ^(.+\.php)(/.+)$;
        fastcgi_pass unix:/run/php/php8.1-fpm.sock;
        fastcgi_index index.php;
        include fastcgi_params;
        fastcgi_param PHP_VALUE "upload_max_filesize = 100M \n post_max_size=100M";
        fastcgi_param SCRIPT_FILENAME $document_root$fastcgi_script_name;
        fastcgi_param HTTP_PROXY "";
        fastcgi_intercept_errors off;
        fastcgi_buffer_size 16k;
        fastcgi_buffers 4 16k;
        fastcgi_connect_timeout 300;
        fastcgi_send_timeout 300;
        fastcgi_read_timeout 300;
        include /etc/nginx/fastcgi_params;
    }

    location ~ /\.ht {
        deny all;
    }
}
pterodactyl.conf
Once you've saved the file, we've told nginx that this site is available, but now we need to enable it by creating a sym-link in the enabled-sites folder:
sudo ln -s /etc/nginx/sites-available/pterodactyl.conf /etc/nginx/sites-enabled/pterodactyl.confbash
Now we can restart nginx to start up the panel website by running sudo systemctl restart nginx
At this point, you should be able to navigate to the IP address of the server and get to the Web UI / Panel. It will complain about the certificate, since we are just using a self-signed certificate, this is fine for the time being.
Other Config
Reverse Proxy
There are some other things you might need to take care of to get this running properly. As mentioned, I am running a reverse proxy to handle all web requests, so I need to make a change in my .env file to allow the proxied requests.
I will not be covering how to setup or use Nginx Proxy Manager in this guide, but look for a future blog post on it!
Adding the line TRUSTED_PROXIES=<IP> will allow a target IP to make proxy requests to the server. I am hosting a reverse proxy server, so I will need to add that IP to the trusted list:
(Use whatever IP your Nginx Proxy Manager instance is hosted on)
TRUSTED_PROXIES=192.168.1.126.env
I also need to setup the proxy on my Nginx Proxy Manager. Login to the UI, click Hosts > Proxy Hosts > Add Proxy Host and fill in the appropriate info. Pay special attention to the following details for best security practices:
- Set scheme to
httpsand forward port to443 - On SSL page, make sure to select
Request a new SSL certificate, and checkForce SSL
Additionally, for nginx reverse proxy, we have to add some Advanced config:
proxy_set_header X-Real-IP $remote_addr;
proxy_set_header Host $host;
proxy_set_header X-Forwarded-For $proxy_add_x_forwarded_for;
proxy_set_header X-Forwarded-Proto $scheme;
proxy_redirect off;
proxy_buffering off;
proxy_request_buffering off;
NGINX
Mail Server
If you want to send emails for you Pterodactyl Server, you need to setup a mail sending service. I will be using the Gmail SMTP server to do this.
You will not want to login to Gmail SMTP using your regular password, create an App Password instead.
You can use several different ports, which correspond to different Encryption Methods. I highly recommend using TLS, or at least SSL.
- TLS = 587
- SSL = 465
- (none) = 25
To setup mailing, on your Panel Web UI go to Admin > Settings > Mail
- SMTP Host: smtp.gmail.com
- SMTP Port: 587
- Encryption: TLS
- Username: gmail username
- Password: App Password you used earlier
- Mail From (Name): Whatever email address and name you want on the "From"
Wings
Wings is the engine that runs the servers. You could have multiple nodes or machines running wings, and Panel will be the central control that uses all the nodes that run wings.
In this case, I will be running Wings on the same server as Panel, but you might in other instances install them on separate machines.
Prerequisites
Operating System
Wings has basically the same requirements as Panel, the big thing it needs is the capability to run Docker. In our case, the Ubuntu 22.04 server will work great.
Dependencies
The only dependencies here are curl (which we installed earlier) and Docker, which we will install now:
curl -sSL https://get.docker.com/ | CHANNEL=stable bashbash
Now let's set Docker to start on boot
sudo systemctl enable --now dockerbash
To help prevent Out-Of-Memory errors on our servers, we will enable Docker to use memory swap. This setting is found in the grub settings at /etc/default/grub. We need to make the following changes:
- Add the value
swapaccount=1in theGRUB_CMDLINE_LINUX_DEFAULTsetting. - Add the value
systemd.unified_cgroup_hierarchy=1in theGRUB_CMDLINE_LINUXsetting. (This will allow Panel to see container's CPU and RAM usage)
Then we can update grub with sudo update-grub and then reboot using sudo reboot
Installing Wings
File Directory Setup
First we need to make a directory for Pterodactyl Wings to run, and then clone down the official GitHub repository, then setup the file permissions to make Wings executable.
sudo mkdir -p /etc/pterodactyl
curl -L -o /usr/local/bin/wings "https://github.com/pterodactyl/wings/releases/latest/download/wings_linux_$([[ "$(uname -m)" == "x86_64" ]] && echo "amd64" || echo "arm64")"
sudo chmod u+x /usr/local/bin/wings
bash
Adding Wings Node
To create a node, first we need to create a Location.
After you make a Location, go to Nodes and chose Add Node. You can customize most of these options, but one thing of note here is that to use SSL between Panel and Wings, you need a FQDN to point to the Wings node. Since my Wings and Panel are running on the same server, I used the same FQDN. Once you put in your settings and create the wings node, you'll want to copy the configuration file, and create a new file on the server at /etc/pterodactyl/config.yml and paste it in there.
SSL
Since I am using Nginx Reverse Proxy, I am already generating SSL certificates for this domain name. I just need to copy the certificate files from the Nginx Reverse Proxy server to the Wings server, which I am doing using SSH on a monthly cronjob.
Testing Connection
Once you get the configuration file and SSL certificate files in place, test the connection to panel by running sudo wings --debug. If there are any errors, it will tell you what they are, otherwise everything will look good.
Daemonizing Wings
We will want to setup wings to run in the background, and start on boot. Create a new file called wings.service in /etc/systemd/system with the following contents:
[Unit]
Description=Pterodactyl Wings Daemon
After=docker.service
Requires=docker.service
PartOf=docker.service

[Service]
User=root
WorkingDirectory=/etc/pterodactyl
LimitNOFILE=4096
PIDFile=/var/run/wings/daemon.pid
ExecStart=/usr/local/bin/wings
Restart=on-failure
StartLimitInterval=180
StartLimitBurst=30
RestartSec=5s

[Install]
WantedBy=multi-user.target
systemd
Now enable it:
systemctl enable --now wingsbash
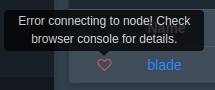
To verify it is working, go to the Nodes tab in Panel, and check that the node has a green heart, and displays a version number when you hover over it:

If you see this, there is an error you need to resolve. Check that the wings service is running, or try running the debug command again to see why it is not connecting.
Networking Considerations
These two Daemon ports need to be open between the Wings Node and Panel, whether that's through internal networking, or external.

Creating a Server
Creating a server is really easy once you have everything setup. I won't go into detail here since the UI is so straightforward if you are using a pre-configured egg.
Custom Nest+Egg Example
There are some great options already built in, but there are many cases where you might want to create a server that doesn't already exist. With some docker knowledge, you can get nearly any server to work. For this example, we will use Mindustry.
Since Pterodactyl runs Docker under the hood, you can mess around on your local machine using Docker to figure a lot of these things out. This is what I did to figure out how to run Mindustry properly, and it took a lot of trial and error. If you are not up to this, you might stick with the official nest/eggs, or use community pre-configured ones, but you should be extra wary using community configurations, as you never know what people might have put in them.
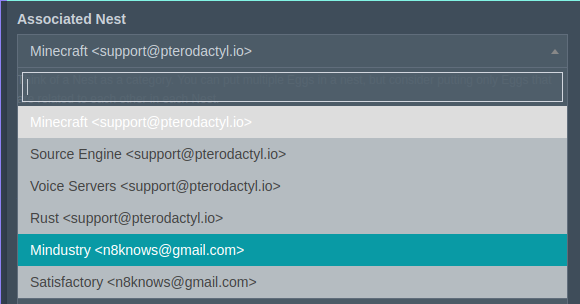
Go to the Nests screen on the left menu. If you are using a community-created egg, you can import it using the green "Import Egg" button, otherwise you can use the "Create New" button to make a completely new, custom egg.

Next, give your nest a name and description. An egg is a specific implementation of a server, and a nest is a group of egg. Mindustry doesn't fix any of the existing nests, so we will make a new one. Once you create your nest, then we can click "New Egg"
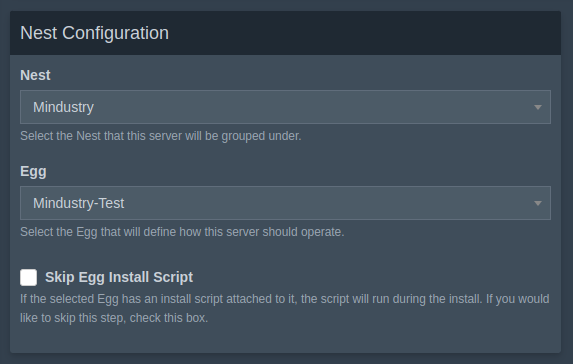
Even though you may have entered this screen from a Nest, you still need to specify which nest this new Egg belongs in:
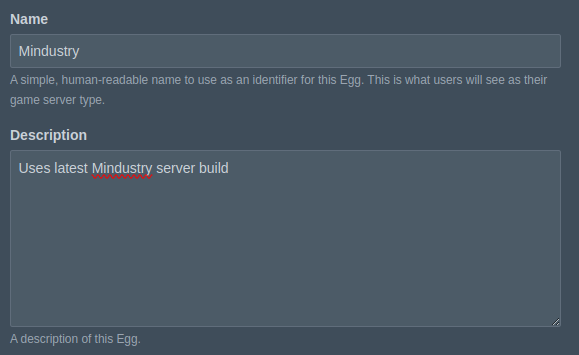
Give it a name and a description, in this case we will do Mindustry. Description doesn't matter, but pick a good one to help you and your users.
Now we will need an understanding of how the server runs in order to properly create our egg. By looking at the Mindustry GitHub, we can tell that the server is a Java application, and needs specifically Java 16 or 17. Luckily there are already plenty of Java optimized docker images for us. In this case we will use Pterodactyl's provided Java image, which they use for Minecraft: ghcr.io/pterodactyl/yolks:java_17

For 'Startup Command', we need to choose which command will be run in the container to start the Mindustry server. We will use the typical command to start a Java application, java -jar "jar-name.jar"

The other config settings will vary widely depending on the server. It takes a decent understanding of each game server and how it works to get these settings right.
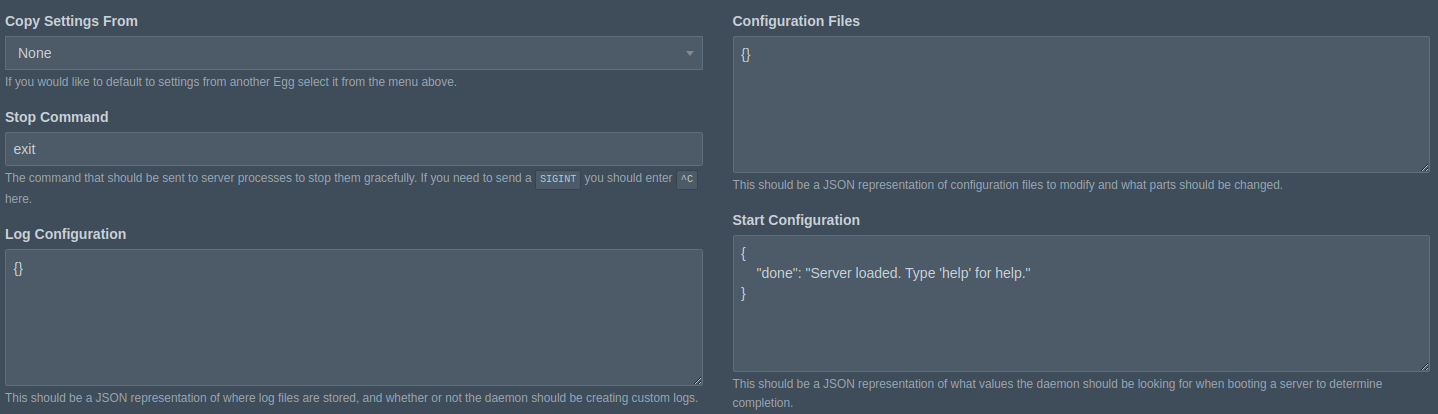
- For 'Stop Command", Mindustry uses
exitto shut down the server. - I couldn't figure out where logs were stored, so you can just leave
{}to represent empty JSON - Mindustry doesn't use a configuration file, such as a
server.propertiesorconfig.jsonor anything like that so we will leave it empty with{}as well. - Start configuration can take several values, but the most important one is the "done" key, which is what tells Pterodactyl that the server started up successfully. Use this JSON block for Mindustry:
{ "done": "Server loaded. Type 'help' for help." }
After you set these settings, go ahead and click Create. If there are any issues, they will be in red at the top of the screen, go ahead and address them before moving on.
Once the Egg is created, we have two choices for creating servers:
- Configure them manually
- Automate the installation and configuration
First I will show you how to manually get a server up and running, then I will show you how we can automate it.
Manual Creation
With an egg created, we can go ahead to the Servers menu option, and click Create New. Set the Name and Description for the server, in the Owner box start typing your email address in the Owner box and select your name when it drops down.
You can configure your resource management to your liking (you must set Memory and Disk usage, but you can just choose 0 and move on), and then in the Nest Configuration Box, make sure to select your new Nest and Egg. Then click Create Server .
Once you create the egg, click the little box with an arrow to the right of Delete to open the server console page.
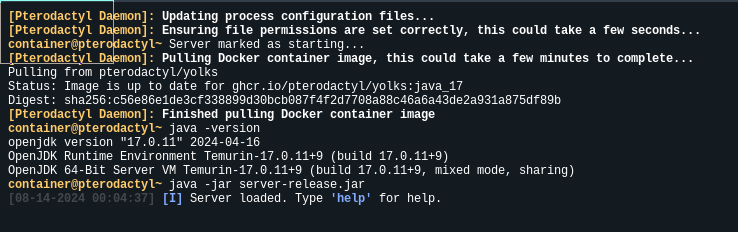
This new server is running a container image with Java ready to go, but we still need to supply the server jar file. We can go to Files, and Upload the server-release.jar file, which you can download from the official GitHub releases page.
Once you upload the file, you can go back to Console and click Start, and watch the server start up. If all goes well, you'll see the message: Server loaded. Type 'help' for help. Which tells us that the server is running!
Mindustry requires you to start hosting by running the command host in the console before we can connect. Now you can connect from any Mindustry game client on the local network, and if you set up Port Forwarding, you can even access it externally as well!
Automatic Creation
Uploading the server.jar file isn't too difficult, but we can even automate that process away so that if our less-informed friends can also spin up a server with ease.
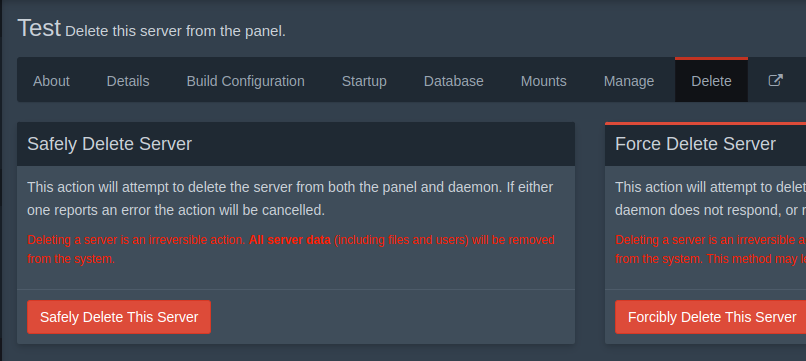
If you created a server the manual way, go ahead and stop that server, and then delete the server.
Now go back to the Egg you created (Nests > Mindustry > Your Egg), and go into the Variables. We will want to make some changes here to follow best practices and allow modulation in our server creations. Add the following variables:
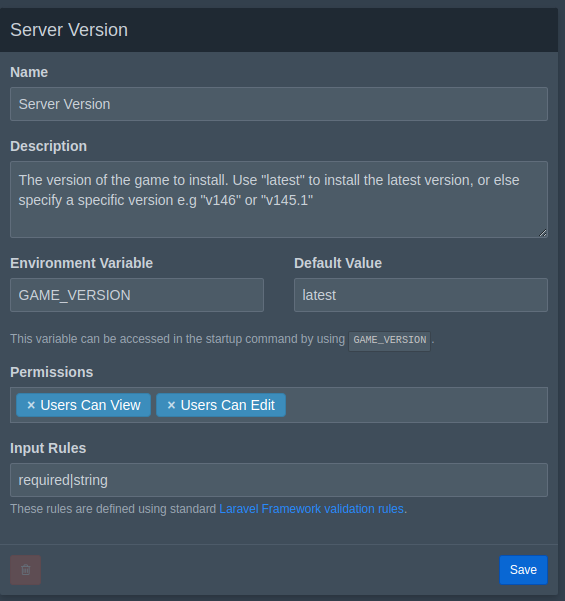
The description isn't necessary, but it is helpful to tell other users (and your future self) how to use this correctly.
Now we can go to Install Script. This section is where you can put commands to initialize the server before running anything else. It will do it using a Docker image of your choosing, so you will probably want to pick a basic Linux one like Alpine, which is what we will use.
This will require some Bash knowledge, so I'll go ahead and show you the script that I'm using, and then a bulleted summary of what is going on inside.
#!/bin/ash
# Mindustry Server Installation Script
#

# Slight delay to allow user to open console
sleep 2

# Setup the directories and put us in the right location
mkdir -p /mnt/server/
cd /mnt/server
pwd
ls -l

# Add openssl, to allow wget over HTTPS
apk add --update openssl

# Check if server file already exists
if [ -f ./server-release.jar ]; then
    echo "Server jar found! Creating backup"
    date=$(date '+%Y-%m-%d_%H-%M-%S')
    mkdir -p bak
    mv ./server-release.jar ./bak/server-release_$date.jar
    echo "Downloading new server "
else
    echo "Server file not found, downloading new version from GitHub"
fi

# Download the right server version based on the environment variable (defaults to "latest")
echo "Downloading server jar version: $GAME_VERSION"
if [ "$GAME_VERSION" == "latest" ]; then
    wget https://api.github.com/repos/Anuken/Mindustry/releases/latest -O - | awk -F \" -v RS="," '/browser_download_url/  {print $(NF-1)}' | xargs wget
else
    wget https://api.github.com/repos/Anuken/Mindustry/releases/latest -O - | awk -F \" -v RS="," '/browser_download_url/  {print $(NF-1)}' | xargs wget
fi

# Remove the unnecessary client .jar
rm Mindustry.jar

ls -l

echo -e "Install Complete"
ash
Make sure that the Script Container is alpine and the entrypoint is ash
Hopefully the comments helped explain things on their own, but here's the jist of it:
- Use the Ash console
- Setup the directory and put us there
- Add openssl so we can download the server file from GitHub
- Check if the file already exists
- If it does, back it up
- Check the version specified in the server's environment variables
- If using latest, get the latest version from GitHub
- If using another version, get that version from GitHub
- The download will include the client and the server .jar, so we can remove the client one.
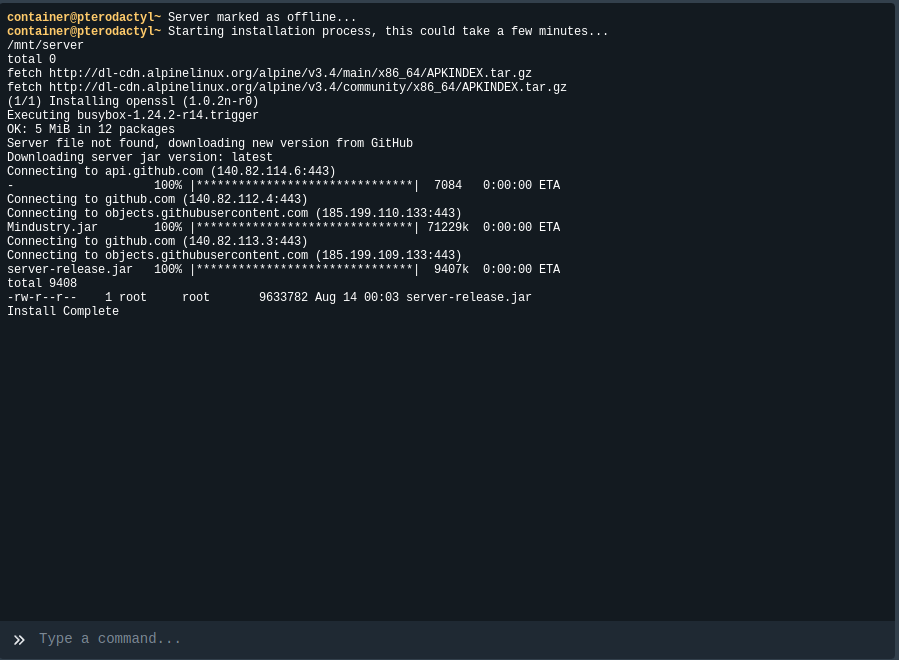
Now that we have an install script setup, we can create a new server just like we did before. If you hop over to the console quick enough (there's a 2 second delay added to the script to help with this), you can see the install happening on the console:
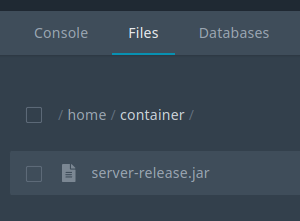
Now if you head over to the files tab, you should see the server jar already there, without the need to upload it!
We are now safe to start the server just like normal!

If you made it to the end, congrats! This was no small feat, and you deserve a pat on the back. Hopefully you learned a lot along the way, and now have an easy way to create game servers, or let your friends create them on their own!
If you have any questions, or see any corrections needed, please leave a comment below, or reach me at contact@n8pete.com.
Other Resources
Here are some other resources you might find helpful during your setup.
YouTube video from lilciv:
https://www.youtube.com/watch?v=cbr8tddvAWw
Official Pterodactyl Panel Documentation:
https://pterodactyl.io/panel/1.0/getting_started.html
Nginx Proxy Manager:
https://nginxproxymanager.com